According to PMC research on packaging design, 72% of consumers say packaging design influences their purchasing decisions — and that influence doesn't stop at the outer box. The insert a customer unfolds, reads, or simply notices shapes their perception of the brand just as much as the carton itself.
Designing an effective insert isn't complicated, but outcomes vary widely based on insert type, material, design objectives, and production specs. Get those variables right, and an insert becomes a loyalty tool. Get them wrong, and it's either landfill or — worse — the reason a product arrived broken.
This guide covers the full design process, from clarifying your objectives to preparing production files, along with the key parameters that separate inserts that perform from ones that disappoint.
Key Takeaways
- Custom inserts serve two roles: functional (product protection, care instructions) and marketing (brand storytelling, repeat purchase incentives)
- Insert design follows five stages — from defining purpose through material selection to production approval
- Material choice — paperboard, corrugated, or foam — depends on product fragility, shipping environment, and brand positioning
- Die-cut precision and insert-to-box color consistency are the two most overlooked quality factors
- Skip physical prototyping before a full run and it's likely the most costly mistake you'll make
What Are Custom Product Inserts for Packaging?
Custom product inserts are purpose-designed components placed inside a box or carton — distinct from the outer packaging — that either secure the product physically or communicate brand and product information to the customer.
They fall into two broad categories:
- Structural/protective inserts — die-cut trays, foam cutouts, corrugated dividers, and paperboard cradles that hold the product in position during transit
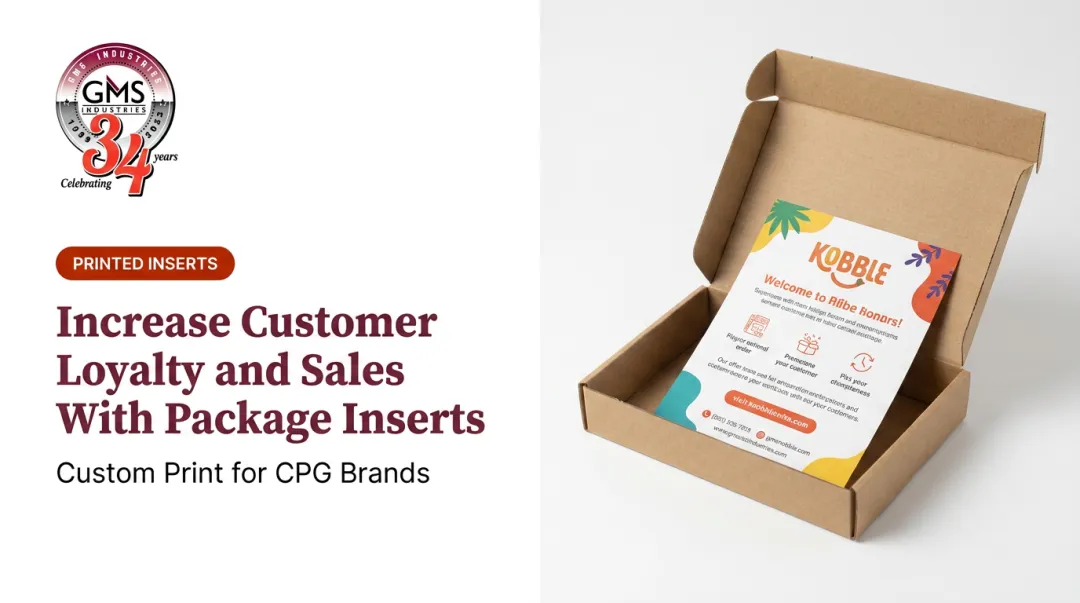
- Promotional/informational inserts — thank-you cards, instruction sheets, discount offers, loyalty cards, and QR code cards that engage the customer after the box is opened
These aren't mutually exclusive. A cosmetics brand might use a paperboard tray to secure a glass bottle and pair it with a printed card offering a reorder discount. One protects the shipment; the other protects the next sale.
Industries Where Inserts Have the Most Impact
The insert type and complexity vary significantly by category:
| Industry | Primary Insert Need |
|---|---|
| Consumer electronics | Foam or corrugated protection; compliance documentation |
| Cosmetics / personal care | Premium printed inserts; branded unboxing experience |
| Frozen foods / CPG | Cooking instructions; nutritional compliance sheets |
| Pharmaceuticals | Regulatory inserts; multi-language IFUs |
| Hardware / home goods | Assembly guides; multilingual instruction sheets |
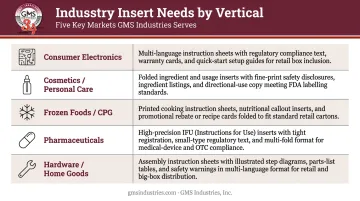
Across these categories, insert requirements range from simple single-language instruction sheets to multi-fold bilingual guides. GMS Industries, for instance, produces bilingual quick-start guides for Kwikset smart locks and multilingual usage sheets for skincare brands — each with defined minimum order quantities and production specifications.
The global packaging inserts market was valued at $28.2 billion in 2025, projected to reach $48.4 billion by 2035 at a 5.5% CAGR, according to Future Market Insights. With that volume of product moving through supply chains, insert design decisions have real consequences — for product safety, regulatory compliance, and customer experience alike.
How to Design Custom Product Inserts for Packaging
Step 1: Define the Purpose and Target Audience
Before any design work begins, clarify what outcome the insert needs to achieve. The options include:
- Product protection during transit
- Unboxing experience enhancement
- Brand storytelling
- Repeat purchase or loyalty incentive
- Compliance or care instructions
- Some combination of the above
A single insert can serve multiple purposes, but it should have one primary function driving all design decisions. An insert trying to do six things at once typically does none of them well.
Audience understanding shapes everything. A cosmetics buyer opening a premium skincare kit expects soft-touch materials, restrained typography, and a tone that matches the brand's voice. A contractor opening a hardware package needs a bilingual quick-start guide — easy to read in low light, with clear diagrams and no clutter.
These are different inserts for different people. Design accordingly.
Step 2: Determine the Insert Type
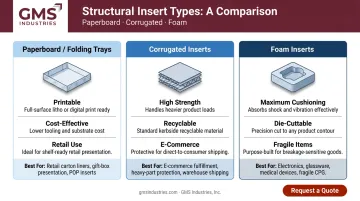
Match insert type to the product and packaging format. There are three main structural categories:
- Paperboard/folding trays and dividers — lightweight, highly printable, cost-effective, ideal for retail cartons with moderate protection needs
- Corrugated inserts — stronger, recyclable, suited for heavier products or e-commerce shipping where transit stress is higher
- Foam inserts — maximum cushioning, die-cuttable to precise product contours, preferred for fragile or high-value items like electronics, optics, or premium spirits
Promotional and informational inserts — cards, instruction sheets, loyalty offers — typically accompany a structural insert rather than replace it. The structural insert protects the product; the printed insert works on the customer.
Packaging format matters here too. Folding cartons pair naturally with paperboard inserts. Corrugated shipping boxes need corrugated or foam inserts for adequate transit protection. A lightweight paperboard tray won't survive three distribution centers — that mismatch shows up as damage claims.
GMS Industries manufactures printed and informational inserts — instruction sheets, promotional printed materials, and compliance documentation — with diecutting capabilities that support structural paperboard formats. For foam inserts specifically, contacting GMS directly to discuss project scope is the right starting point.
Step 3: Plan Dimensions, Layout, and Branding
Dimensions first, always. Measure the product's exact length, width, height, and any shape irregularities before finalizing insert dimensions. An imprecise fit allows product movement during transit, which is the leading cause of damage claims. The insert should hold the product snugly — no pressure points on fragile areas, no excess movement.
Once dimensions are locked, map the visual layout:
- Logo placement and sizing
- Brand color palette (with Pantone callouts for brand-critical colors)
- Typography hierarchy — product name, tagline, instructions, QR code
- Any secondary content: social handles, reorder information, certifications
The insert is an extension of the outer packaging. Color shifts, font inconsistencies, or tonal mismatches between the carton and the insert erode brand perception faster than most brands realize. Treat both components as one creative system — not two separate print jobs.
For premium product categories — cosmetics, specialty spirits, high-end electronics — consider where die-cutting, embossing, or unique shapes can elevate the insert beyond a flat card. An insert with a precisely die-cut window or a debossed logo communicates a level of intentionality that flat-printed stock simply cannot match.
Step 4: Select Materials and Finishes
Choose material based on three variables: product fragility, shipping environment, and brand positioning.
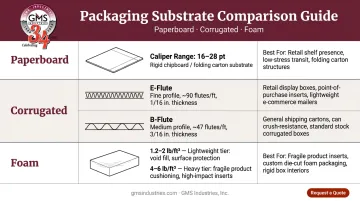
Paperboard (typically 16–28 pt caliper for folding carton applications) works well for retail inserts, promotional cards, and instruction sheets where transit stress is low and printability matters. Lightweight, highly printable, and recyclable.
Corrugated offers structural strength for heavier products. Per the Fibre Box Association, two flute profiles dominate insert applications: E-flute (1/16 inch, ~90 flutes per foot) for retail inserts where printability matters, and B-flute (1/8 inch, ~47 flutes per foot) for heavier consumer goods needing more cushioning.
Foam provides maximum cushioning for fragile items. Polyurethane open-cell foam at 2 lb/ft³ suits delicate electronics; higher-density polyethylene closed-cell foam at 2 lb/ft³ handles heavier products requiring rigid support.
Finish selection should reflect brand positioning:
- Gloss UV coating — bold, premium look; good durability
- Soft-touch laminate — tactile luxury; communicates restraint and quality
- Matte lamination — understated sophistication; common in premium skincare and spirits
- Aqueous (AQ) coating — cost-effective protection; standard for high-volume printed inserts
GMS's Komori presses support inline AQ and UV coating options, which can be applied to printed inserts in a single pass — reducing production time and maintaining color consistency.
Step 5: Review, Approve, and Prepare for Production
Pre-production review is not optional. It's the step that catches the mistakes that cost real money.
Before committing to a full production run:
- Verify dimensions against actual product samples — not just drawings. Physical fit testing with the real product reveals problems that CAD files don't
- Review print proofs for color accuracy — especially brand colors that must match across the outer carton and the insert
- Test structural inserts through basic drop and compression testing before scaling up
- Provide complete specifications to your manufacturer — material type and weight, finish requirements, CMYK or Pantone color specs, die-cut tolerances, and quantity
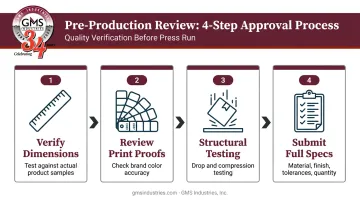
GMS Industries uses a Fuji Final Proof digital dot contract proof and GMG color management workflow for color verification before production, with ICC profiling ensuring consistency across substrates. When an outer carton and its accompanying insert are printed on the same Komori press run, they share identical ink train conditions — the most reliable path to color matching between packaging components.
Catching file issues before plates are made is where experienced manufacturers earn their value. A single prepress correction costs far less than a reprint run or a wave of damage claims.
Key Design Parameters That Affect Insert Quality
Even well-designed inserts fail when production variables aren't controlled. These four parameters are where most quality problems originate.
Insert Fit and Dimensional Accuracy
An insert that doesn't fit precisely allows product movement, increasing damage risk and reducing the perceived quality of the unboxing experience.
Die-cut tolerances vary significantly by material:
- Folding carton (paperboard): +/- 0.5 mm or better
- Corrugated: +/- 1.5 mm to +/- 3 mm for insert applications (broader for standard box manufacturing)
This gap matters for tight-fitting inserts. A paperboard tray can be engineered to very precise product dimensions; a corrugated insert requires more dimensional allowance. Material choice directly constrains achievable fit accuracy.
Material Weight and Density
Under-specified material weight means the insert compresses or warps under load. Over-specified material adds cost and shipping weight without adding protection.
Match material weight to your product's actual load requirements:
- Paperboard: Standard folding carton calipers run 16–28 pt
- Corrugated: E-flute for lightweight retail applications; B-flute for heavier structural needs
- Foam: Lower-density (1.2–2 lb/ft³) for lightweight fragile items; higher-density (4–6 lb/ft³) for heavier products
Print Color Accuracy and Finish Consistency
Brand colors that shift between the outer box and the insert — even subtly — create a perception of inconsistency. The accepted threshold for brand color matching in commercial packaging is Delta E less than 2.
When inserts and outer packaging are printed on separate press runs or different substrates, Pantone (PMS) inks provide notably better cross-component consistency than CMYK. PMS inks are pre-mixed to exact formulas; CMYK builds color from four overlapping ink layers, introducing variation across runs.
For your spec sheet:
- Use PMS for brand-critical colors that must match across components
- Use CMYK for photographic content or non-critical decorative elements
Die-Cut Precision and Structural Integrity
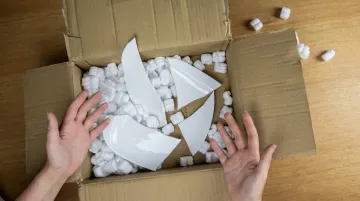
For structural inserts, imprecise die-cutting means the product either doesn't seat correctly or puts stress on fragile points. This is not a problem that shows up in a digital file review — it shows up when the product arrives broken.
Prototype with actual product samples before finalizing die-cut files. A hand-cut mock-up from the actual substrate takes hours and costs next to nothing. Catching a 1 mm dimensional error at that stage — before plates are made and stock is committed — is the cheapest quality control step in the entire process.
Common Mistakes When Designing Custom Product Inserts
Most insert design problems are avoidable. They tend to fall into four repeating patterns — each one fixable before a single sheet goes to press.
Skipping dimensional prototyping. Designing entirely in software without building a physical prototype leads to costly reprints and damaged shipments. Even a simple hand-cut mock-up from the selected material, tested against the actual product, catches fit problems before they become production problems.
Ignoring brand consistency. Treating the insert as a separate design project rather than an extension of the outer packaging creates visual disconnects. Brand colors, typography, messaging tone, and finish treatments all need to align across every packaging component. Research on color consistency in packaging confirms that substrate-to-substrate color variation is one of the most common and preventable quality failures.
Over-designing for the wrong audience. Packing an insert with too much information, multiple offers, or excessive visual elements reduces impact. Inserts with a single, clear primary message outperform cluttered ones. Visual hierarchy and whitespace are functional tools — not aesthetic preferences.
Choosing materials based on cost alone. The cheapest material rarely performs across the full product journey. According to Amcor, 34% of packaging-related returns are due to product damage, and replacing a single damaged product can cost up to 17 times the original shipping cost. The per-unit savings on a cheaper insert substrate disappear quickly against that return cost.
Frequently Asked Questions
Frequently Asked Questions
What are inserts in packaging?
Inserts are components placed inside a product's box or carton, separate from the outer packaging itself. They serve either a structural purpose (protecting the product during transit) or an informational/promotional purpose (brand messaging, instructions, discount offers) — and often both simultaneously.
What materials are most commonly used for custom packaging inserts?
The three main options are paperboard, corrugated cardboard, and foam. Paperboard is lightweight and printable; corrugated handles shipping stress; foam provides maximum cushioning for fragile or high-value items. Material choice depends on product fragility, packaging format, and brand positioning.
How do I get the sizing right for a custom packaging insert?
Measure the product's exact dimensions — length, width, height, and any shape irregularities — first. Design the insert to those measurements with tight tolerances, then validate fit using a physical prototype before committing to a full production run. No amount of careful CAD work replaces a physical fit test.
What should be printed on a product packaging insert?
Common insert content includes:
- Brand logo and colors
- Product instructions or care tips
- A thank-you message or discount offer
- Social media handles or QR codes
Each insert should lead with one primary message — trying to say everything at once typically communicates nothing effectively.
Can packaging inserts be made from eco-friendly materials?
Yes. Paperboard and corrugated inserts are widely available in recycled or recyclable grades. Two Sides North America's 2025 research found that 67% of U.S. consumers prefer paper packaging for its compostability and recyclability — making sustainable insert materials both an environmental and a commercial consideration.
How much does it cost to produce custom packaging inserts?
Cost depends on material type, print color count, finish options, die complexity, and order quantity. A simple flat printed insert costs significantly less than a die-cut structural tray with specialty finishes. Always get samples produced first — they validate cost-per-unit and prevent expensive surprises at scale.